Consolidation, agile, and MVP other similar terms have become buzzwords in the development scene for a while now. They represent a desire to adapt legacy or traditional development methodologies to a rapidly-evolving world – a world where the value and quality of an idea are contingent on the pace of its execution, more than anything else.
Google’s Flutter framework for mobile app development is an excellent example of this change in outlook. With Flutter, developers can churn out mobile apps for Android and iOS simultaneously. The framework lets a flutter app developer write code only once and use it for both Android and iOS platforms, which leads to faster development cycles, quicker product releases, and better adaptability to changing market trends and consumer preferences.
That effectively makes Flutter a cross-platform mobile development framework, which is similar to React Native. Speaking of the latter, we’ve previously written about how to create an app with React Native. Do give it a read if you’re interested in knowing how to develop a React Native app.
What Makes Flutter Special?
Flutter is expected to get better with time. At Google I/O 2019, the framework got a host of updates, which included the release of the technical preview for Flutter Web and a live demonstration of how Flutter apps can run on a desktop environment.
Flutter also uses its own coding framework instead of Android or iOS. Moreover, it also has its own UI system and gives designers and mobile developers a lot of leeway to experiment.
What are the Advantages of Flutter?
There are multiple advantages of using Flutter app development for creating a native Android or iOS app.
-
Cross-Platform Development
As mentioned above, Flutter lets you develop apps for multiple ecosystems. You write code once and use it for two separate apps. This does away with the need to develop two discrete codebases for Android and iOS. It also helps that Google’s upcoming operating system, Fuchsia, is built on Dart, which is also the language that powers Flutter. As such, using Flutter for mobile app development can save you energy, money, and time.
-
Hot Reload
One of the best things about Flutter is that you can view changes made to the code instantaneously. This is a handy feature for a Flutter app developer as it allows them to spot and fix bugs quickly by making changes to the code on the fly. More importantly, hot reload gives designers and developers more freedom to experiment with new features and improvisations – which can only mean a better end product.
-
Native Features & Performance
Flutter’s platform APIs, third-party integrations, and native codes make it easy to add gestures, effects, and animations to your app. It also integrates the differences between Android and iOS like navigation, fonts, icons etc., which allows users from both platforms to enjoy a seamless native app experience.
-
Widgets
Flutter is widget-centric and offers a basket of customizable widgets. More importantly, all widgets from Cupertino and Material Design packs are included in Flutter. This allows developers to build a smooth UI experience while enabling designers to customize as well as create new widgets quickly.
Flutter Installation – What You Need for Flutter App Development?
Although Flutter is fairly new, it was released in May 2017, there’s plenty of documentation and resources to help you with installing and using it. The Flutter documentation page, for instance, is a good place to start.
As for installing Flutter, it depends upon which development environment you want to use. Flutter offers step-by-step installation guides for Windows, Mac OS, and Linux. Click on the operating system you’re using and follow the instructions therein.
You can develop an app using any text editor combined with Flutter’s CLI (command line interface) tools. However, certain editor plugins are recommended as they provide syntax highlighting, code completion, widget editing assistance, debugging support etc., which make the task of creating a Flutter app easier.
You can add these plugins after installing your preferred IDE (integrated development environment) from Android Studio, IntelliJ, or VS Code.
Once you’ve completed all these steps, you’re ready to start Flutter app development.
Create Your First Flutter App
There are several ways to develop a sample app with Flutter. You can do it via the command line or by using IDEs like Android Studio, IntelliJ or VS Code. For this post, we’ll use the command line method to create a Hello World Flutter app.
You can begin by starting your terminal, navigating to the location where you want to host and run your project from and running this command.
$ flutter create flutter_hello_world
Once the project is created successfully, it’s directory structure will look like this.
flutter_hello_world
android
ios
lib
main.dart
test
As you can see, there are separate directories for the android and ios apps. Most of the code for your Flutter app resides in the two main directories, viz. lib and test.
Further in the lib directory, you’ll find main.dart, which is where your Flutter’s app code resides. By using the main.dart file, you can develop widgets and create any Flutter app you want.
And as borne out by the name, the test directory is where you can write tests for your Flutter app.
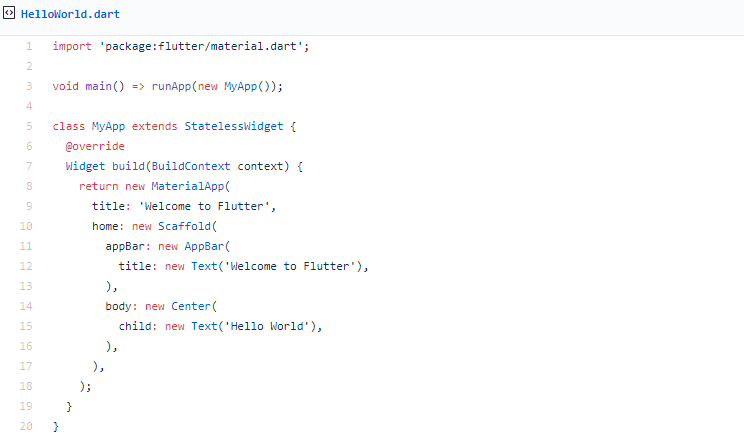
To create a Hello World Flutter app, you need to make changes to the main.dart file. Or rather, you need to delete all its contents and replace them with the following Hello World code.
After you paste and save the code, it’s time to run your newly created Hello World Flutter app. Make sure you have setup/connected a simulator/device to run your app on. And as with creating the app, you can use either IDEs or the command line to run the app.
In the case of the latter, navigate to the app’s root directory and run this command if you have connected only one device.
$ flutter run
If you have more than one device, use the first command below to retrieve their respective IDs. Once you have the IDs, run the second command.
$ flutter devices
$ flutter run -d DEVICE_ID
But if you want to run the app on all the connected devices, simply run this command.
$ flutter run -d all
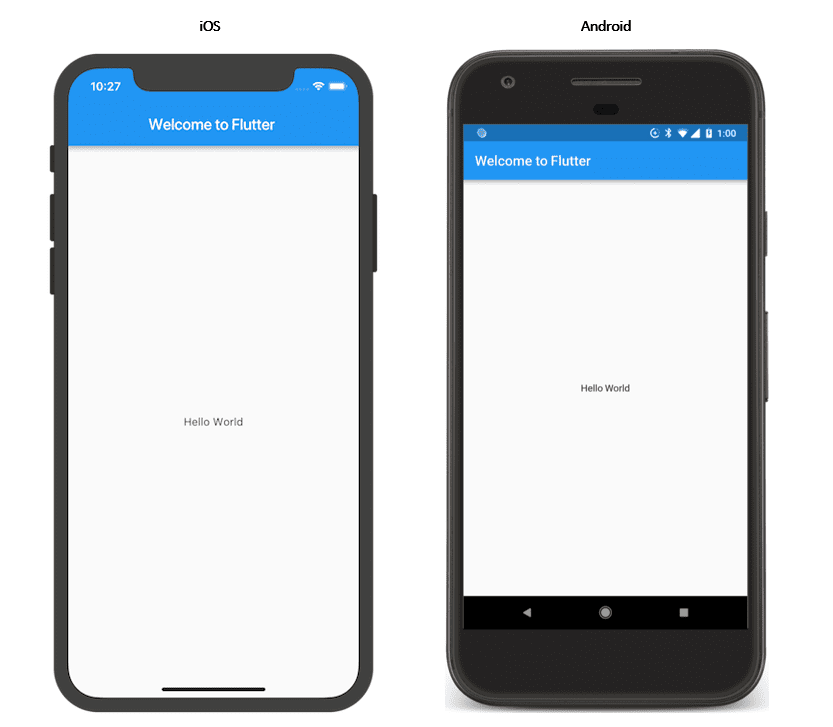
And that’s it, you should now see a Hello World app running in the simulator or device.
Congratulations, you’ve successfully created your first Flutter app!
You can also try out other apps to improve your Flutter development skills. There are loads of Flutter samples and popular Flutter open-source projects that not only enjoy official Flutter support but also enthusiastic Flutter app developer community participation.
You can also make changes to your Flutter app on the fly once it’s been created and run. To do this, simply make the changes you want to the app’s source code while it’s running and hit r.
Doing so will hot reload your app without restarting it, which lets you see the changes you’ve made to your app instantaneously. This ability to reload a running app’s code without restarting engenders faster development cycles and more creative products.
And as mentioned above, you can also create and run your Flutter app without using a command terminal. Depending upon your preference, you can pick either one among the two methods below.
Can Android & iOS Developers Use Flutter?
Absolutely yes. If you’re well-versed with Android or iOS app development, you can use those skills when developing with Flutter. The only thing you’ll need to learn is how Android and iOS development elements relate to Flutter development elements.
Flutter for Android developers:
- What ‘Views’ are to Android, widgets are to Flutter. In Android, ‘Views’ represent all the things displayed on-screen – buttons, menus, toolbars etc. Widgets, similarly, are descriptions of the various objects in a Flutter app’s UI.
- Developers can generate animations in Android using XML. To do the same with Flutter, they have to use the animation library.
- In Android, you update ‘Views’ by mutating them. But with Flutter, Widgets are immutable and cannot be updated directly. To make changes to a particular Widget in Flutter, you have to modify its state.
You can go through this detailed Android vs Flutter comparison to understand how you can repurpose your Android development skills for Flutter app development.
Flutter for iOS developers:
- As an iOS developer, you use objects from the ‘UIView’ class for creating your iOS app’s UI. To do the same for a Flutter app, you need to use widgets. As such, widgets are the ‘UIView’ equivalent for Flutter.
- As with Android, you can simply update views on iOS by mutating them. But with Flutter, you have to change the widget’s state in order to update it.
- In iOS, you use UINavigationController to manage view controllers. To switch between different screens in Flutter, you need to use ‘Navigator’ and ‘Routes’.
Over to You
And with that, we’ve come to the end of our Flutter app tutorial. While we used a very basic Hello World program to build your first Flutter app, you can try out more complex programs or even write your own Flutter code.
For the latter, you’ll need to learn Dart, which is the programming language used in Flutter. Thankfully, Dart is quite easy and fast to learn. This is doubly true for developers who already know Java, JavaScript, C#, Kotlin, or Swift.
Making things easier still for an aspiring Flutter app developer is the hot reload function, which lets users make, break, and repair things quickly.
Overall, Flutter is a fantastic cross-platform mobile app development framework that offers several benefits for both developers and clients, which makes it truly the language of the future!
Did you find this guide useful? Which aspect of Flutter do you like/dislike the most? Let us know your thoughts in the comments.
Digital Marketing Manager
Responsible for developing and managing web presence, Sarah has been associated with eLuminous Technologies for 7+ years. Strategic and innovative with a passion for Content Marketing and enhancing brand awareness. Administered all business marketing operations and advertisement campaigns that eventually increased web traffic. She works under the motto “Think like a Publisher, not a Marketer.”
