How to Use BLoC to Build a Reactive App with Flutter
Flutter, since its debut in May 2017, has grown by leaps and bounds as a mobile app development framework. Google has consistently released improved iterations of the framework that have not only made developing mobile apps easier but also faster and more cost-effective.
The search-engine giant introduced another major update at I/O 2018 – the ability to build reactive mobile apps with Flutter. So, what is a reactive app and how has Flutter made it easier to develop such an app? Read on to know more.
All of us use reactive apps in our daily lives. Examples include your email and weather apps or the app you use to check out which movies are playing at your local theatre.
A reactive app is one that responds to your actions and needs with a standard set of behaviors. Examples of these responses include reflecting changes in the UI instantaneously, syncing information across multiple devices based upon user inputs (data updates, push notifications, scheduling etc.) and updating devices with the latest updates from the server to ensure top-notch performance and security.
A flutter app developer can build such a mobile app by using reactive programming, which is a way to solve problems by handling multiple data streams asynchronously.
Flutter BLoC Pattern
To understand what follows, you need to know how to build a Flutter app. We have covered the topic in our blog previously, in addition to a post about how to create Flutter widgets. If you are new to Flutter app development, reading those two posts will help you understand the subject of this post better.
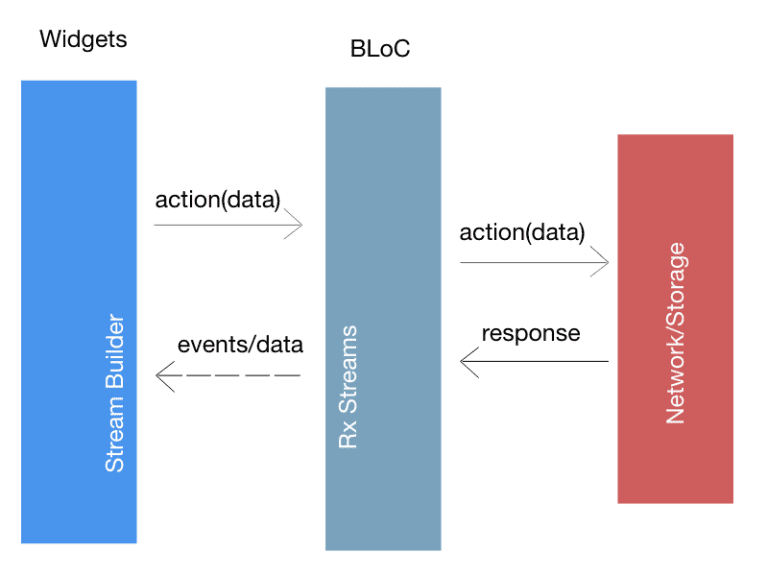
BLoC (Business Logic) pattern builds upon reactive programming to create reactive Flutter apps. In BLoC, all the business logic side implementations are put in one place that acts as a go-between for network elements and UI screens to carry events/data back and forth.

In other words, the UI part does not handle any logic in BLoC pattern; not even data validations. The aim of doing this is simple – to create a business logic and data layers that can be shared while focusing on the presentation layer for each mobile platform.
Building a Reactive Flutter App Using BLoC
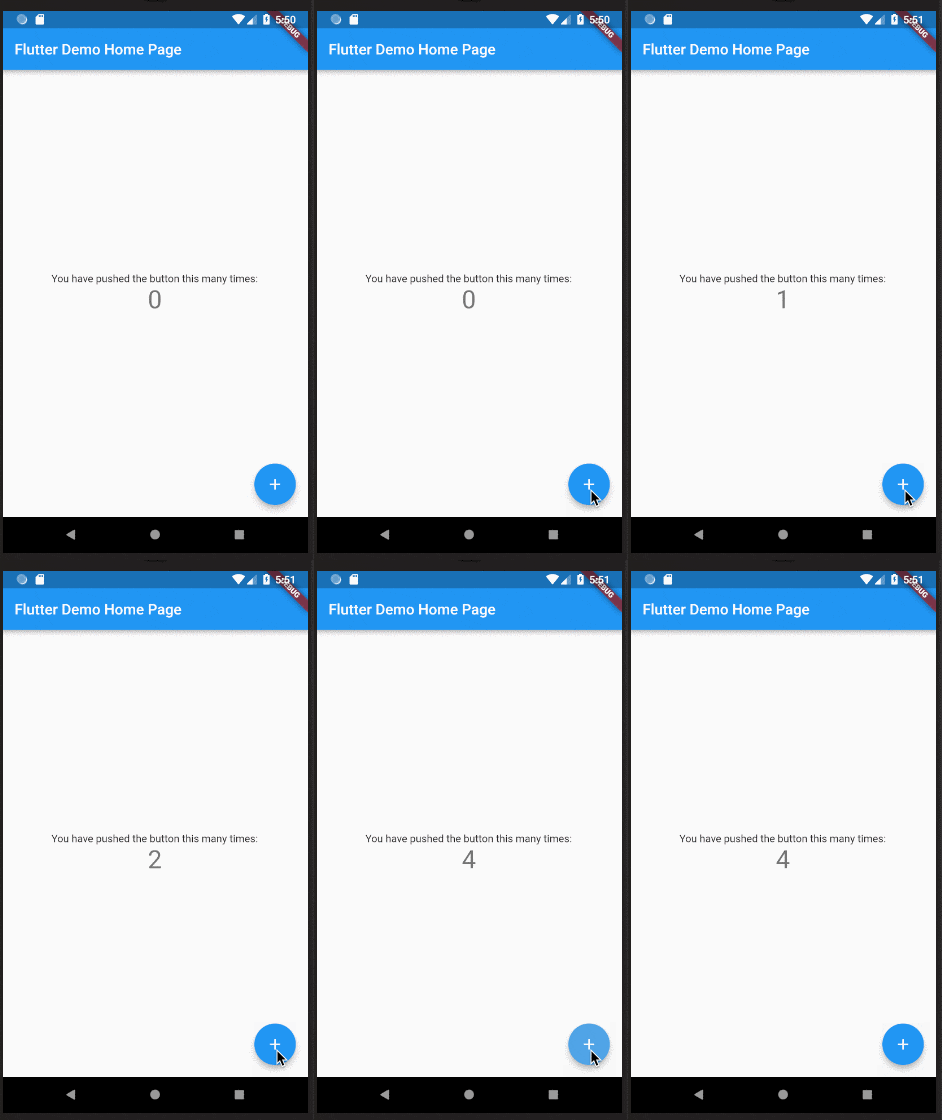
To understand how BLoC helps you build reactive Flutter apps, let’ consider the basic counter app that you get by default when first creating a new project in Flutter app development.

In this app, you can see a counter whose value increases every time you press the floating button. To examine the code of this app, you can navigate to the main.dart file using your preferred IDE. And this is what you’ll see,
import 'package:flutter/material.dart';

void main() => runApp(MyApp());

class MyApp extends StatelessWidget {
@override
Widget build(BuildContext context) {
return MaterialApp(
title: 'Flutter Demo',
theme: ThemeData(
primarySwatch: Colors.blue,
),
home: MyHomePage(title: 'Flutter Demo Home Page'),
);
}
}

class MyHomePage extends StatefulWidget {
MyHomePage({Key key, this.title}) : super(key: key);
final String title;

@override
_MyHomePageState createState() => _MyHomePageState();
}

class _MyHomePageState extends State<MyHomePage> {
	int _counter = 0;

	void _incrementCounter() {
	setState(() {
	_counter++;
});
}

@override
Widget build(BuildContext context) {
return Scaffold(
appBar: AppBar(
title: Text(widget.title),
),
body: Center(
child: Column(
mainAxisAlignment: MainAxisAlignment.center,
children: <Widget>[
	Text(
	'You have pushed the button this many times:',
	),
	Text(
	'$_counter',
	style: Theme.of(context).textTheme.display1,
	),
	],
	),
	),
	floatingActionButton: FloatingActionButton(
	onPressed: _incrementCounter,
	tooltip: 'Increment',
	child: Icon(Icons.add),
	),
	);
}
}
Let us examine some key elements of this code.
- counter is the variable that stores the counter’s value
- incrementCounter is the function that increases the value of _counter
- floatingButton executes the _incrementCounter function
Here, when the data (_counter) changes based on user action (floatingButton), the widget has to be rendered again. This can be done by using a StatefulWidget along with a setState() function.
The code for doing this is pretty straightforward. However, will it still work if you choose to share the _counter variable’s value on a different page within your app? The answer is it won’t, since the data is bound locally to your widget.
Instead, what you need to do is move the data and its updating mechanisms to another place that is accessible from any page/widget within your application. This is exactly what BLoC allows you to do.
Using BLoC for Counter App
The first step is to create a new class that acts as the source of truth for your counter. This class will store the counter’s value as a private variable and use Streams and Sinks to interact with it.
While both are provided by a StreamController, Sinks are used to update the events/data while Streams are used to listen to the changes.
import 'dart:async';

import 'package:rxdart/rxdart.dart';
import 'package:rxdart/subjects.dart';

class CounterBloc {
int _counter = 0;

final _counter$ = BehaviorSubject<int>(seedValue: 0);
final _incrementController = StreamController<void>();

CounterBloc() {
_incrementController.stream.listen((void _) => _counter$.add(++_counter));
}

Sink<void> get increment => _incrementController.sink;

Stream<int> get counter$ => _counter$.stream;

void dispose() {
_incrementController.close();
_counter$.close();
}
}
In this case, we use counter$ to depict the changes to _counter and increment for increasing its value.
Look closer at the constructor and you’ll see how the input sink is linked to the output stream. This ensures that a new counter value is emitted after the execution of every increment.
Now that you’ve coded the logic, you need a way to access it through a widget. For this, you can use InheritedWidget, which is a special kind of widget that lets you broadcast information throughout the widget tree. In Flutter app development, InheritedWidget ensures that if there are any changes, all widgets using it will be re-rendered as well.
import 'package:flutter/material.dart';

import 'package:flutter_counter_bloc/bloc/counter_bloc.dart';

class BlocProvider extends InheritedWidget {
final CounterBloc bloc;

BlocProvider({Key key, this.bloc, child}) : super(key: key, child: child);

@override
bool updateShouldNotify(InheritedWidget oldWidget) => true;

static CounterBloc of(BuildContext context) =>
(context.inheritFromWidgetOfExactType(BlocProvider) as BlocProvider).bloc;
With this, you have completed the most essential part of using BLoC to build a reactive mobile app in Flutter. Now comes the task of simplifying the main widget. Note – since your app’s state is now in the BLoC, you don’t require a StatefulWidget. Instead, you can use the state via the BlocProvider.
import 'package:flutter/material.dart';
import 'package:flutter_counter_bloc/bloc/bloc_provider.dart';
import 'package:flutter_counter_bloc/bloc/counter_bloc.dart';

void main() {
final bloc = CounterBloc();
runApp(MyApp(bloc));
}

class MyApp extends StatelessWidget {
final CounterBloc bloc;

MyApp(this.bloc);

@override
Widget build(BuildContext context) {
return BlocProvider(
bloc: bloc,
child: MaterialApp(
title: 'Flutter Demo',
theme: ThemeData(
primarySwatch: Colors.blue,
),
home: MyHomePage(title: 'Flutter Demo Home Page'),
));
}
}

class MyHomePage extends StatelessWidget {
MyHomePage({Key key, this.title}) : super(key: key);
final String title;

@override
Widget build(BuildContext context) {
final bloc = BlocProvider.of(context);
return Scaffold(
appBar: AppBar(
title: Text(title),
),
body: Center(
child: Column(
mainAxisAlignment: MainAxisAlignment.center,
children: <Widget>[
StreamBuilder(
stream: bloc.counter$,
builder: (context, snapshot) => snapshot.hasData
? Text('${snapshot.data}',
style: Theme.of(context).textTheme.display1)
: CircularProgressIndicator()),
],
),
),
floatingActionButton: FloatingActionButton(
onPressed: () => bloc.increment.add(null),
tooltip: 'Increment',
child: Icon(Icons.add),
),
);
}
}
In BLoC Flutter app development, the BlocProvider encompasses the whole application, which means it resides at the top of your widget tree and can be accessed by any widget.
The increment sink is used to create a new event while the counter$ stream, along with a StreamBuilder, is used to re-render the counter after the emission of every new value.
Summing It Up
While this design might seem complex, it comes into its own when you add more widgets and state and share this state in several widgets. In true reactive programming fashion, there is now a single source of logic that stands separate from the app’s presentation/UI layer. And the moment the counter’s value is changed, everyone is notified.
Having said that, this is the most basic form of BLoC you can implement in Flutter. However, the overall concept remains the same irrespective of your use case. With the help of BLoC, your Flutter app developer can ensure your app’s state management is handled efficiently, which is an invaluable attribute to have as your app grows in terms of features, user base, and complexity.


